

REST based Python Data APIs With Flask, Connexion, and MongoDB


Today’s Modern Applications contains lot of dynamic data which comes from the server. A web application has to make a call to server to populate this dynamic data. Such web applications use the concept of REST API, REST API is nothing but the Architectural Style to access the resources through the different Restful Web Services. The aim of this article is to work with flask extension to create a python application and to integrate with Swagger UI without a hitch. Before going into the actual implementation lets understand some key concepts here.
REST API
REST stands for Representational State Transfer. REST is a software architectural style (or software design pattern) that was created to guide the design and development of the architecture of World Wide Web. REST determines how the API looks like. It is a set of rules that developer follows when creating the APIs. One of the rules is you should be able to get a piece of data (a.k.a. a resource) when you link to a specific URL.
Connexion
Connexion is an open-source API first REST framework for Python, built on top of Flask and based on Swagger, targeted for microservice development. Connexion automagically handles request routing, oauth2 security, request validation and response serialization based on a Swagger 2.0 Specification file in YAML, so you don’t have to care about boilerplate anymore.
Swagger
Swagger is a set of open-source tools built around the OpenAPI Specification that can help to design, build, document, and consume REST APIs. The major Swagger tools include: Swagger Editor — browser-based editor where you can write OpenAPI specs Swagger UI — renders OpenAPI specs as interactive API documentation Swagger Codegen — generates server stubs and client libraries from an OpenAPI spec
Implementation
Creating the User REST API
We are going to create a REST API providing access to a collection of users with CRUD access to an individual user within that collection. Here’s the API design for the user collection:
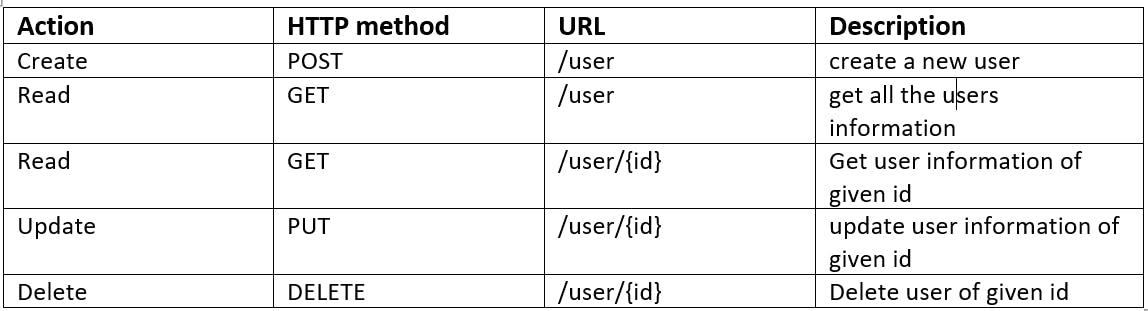
Steps required to create the sample Flask-based API for a user management application: 1)Setup and Installation 2)Integrate Flask-MongoDB 3)Create Database Models 4)Create Schemas 5)OpenAPI Configuration File 6)Handler for User Endpoint 7)Application Entry Point 8)Swagger UI 9)Conclusion
1)Setup and Installation
Prerequisites : Required Python 3 with Pipenv and Git installed.
a) Create a User Management Flask Application : To begin with our application, create a folder called python-flask-application-demo in any directory on the disk for our project.
 Navigate to the project folder.
b) Activate Virtual Environment :
PS> python -m venv venv
PS> .\venv\Scripts\activate
(venv) PS>
The virtual environment will now be activated, which will provide the required project isolation and version locking.
c) Install Dependencies
pip install flask==1.1.2
pip install "connexion[swagger-ui]"
pip install pymongo
pip install marshmallow==2.18.0
Navigate to the project folder.
b) Activate Virtual Environment :
PS> python -m venv venv
PS> .\venv\Scripts\activate
(venv) PS>
The virtual environment will now be activated, which will provide the required project isolation and version locking.
c) Install Dependencies
pip install flask==1.1.2
pip install "connexion[swagger-ui]"
pip install pymongo
pip install marshmallow==2.18.0
2)Integrate Flask-MongoDB
For Flask-MongoDB integration, create a file called db.py having the following content.

3)Create Database Models
Next, we will create database models for our data storage and organization Create the models package and add repositories.py . repositories.py The entities.py file should contain the following content:
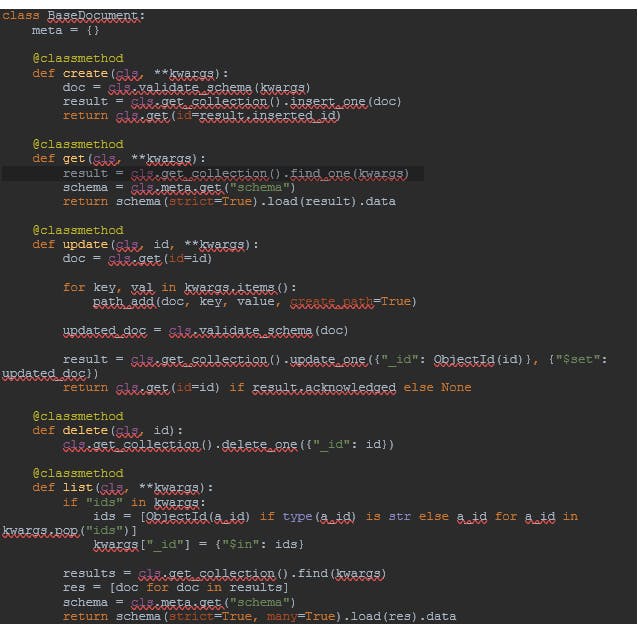
In this repository.py we have defined some helper methods, which we can use to perform CRUD operations on User entity.
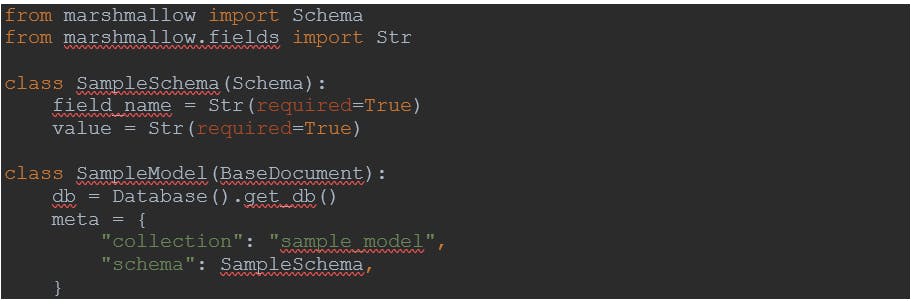
4)Create Schemas
we will create the Marshmallow Schemas from our models defined earlier. We will be using instance of the Marshmallow from Flask-Marshmallow. Create the schemas package and the file named schemas.py
5)OpenAPI Configuration File
Now, let us define the OpenAPI specification for our User Resource. API specifications can be written in YAML or JSON format. Although, YAML and JSON have similar capabilities, YAML is a superset of JSON and tends to be more readable than JSON. Here, we will use the YAML format to write the specification.
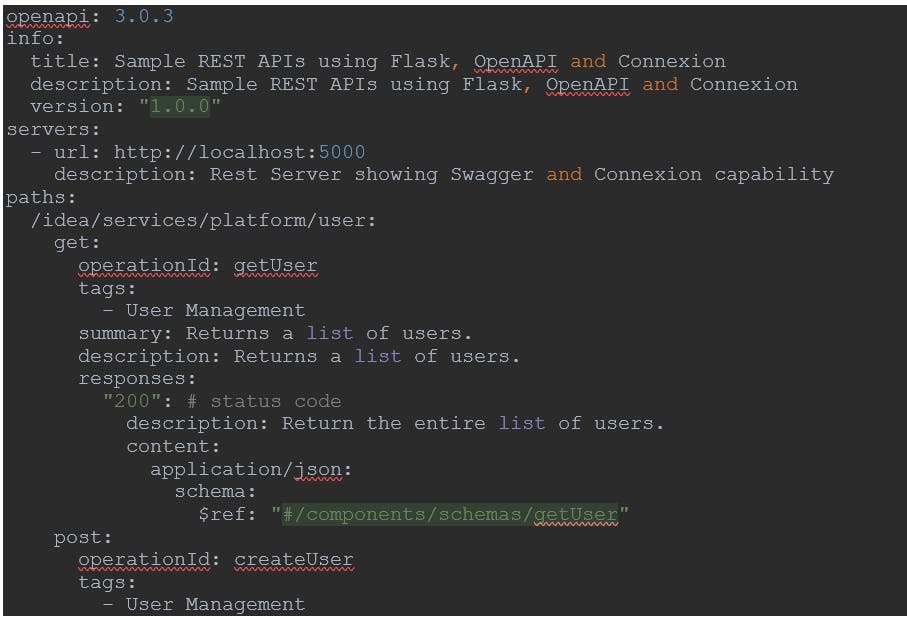
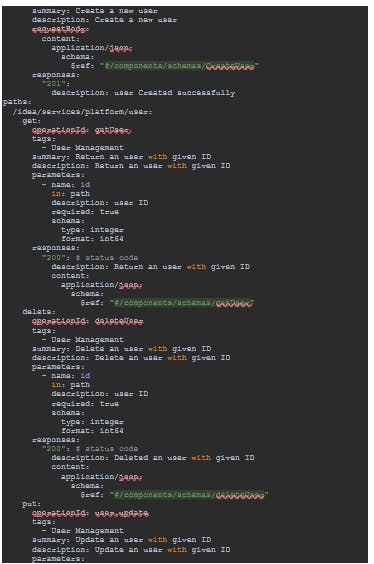
 The above swagger.yml is a YAML file containing all of the information necessary to perform input parameter validation, output response data validation, URL endpoint definition, and Swagger UI.
The specification defines several endpoints for our API. Here, we have defined one endpoint for each of the CRUD (GET, POST, PUT and DELETE) operations.
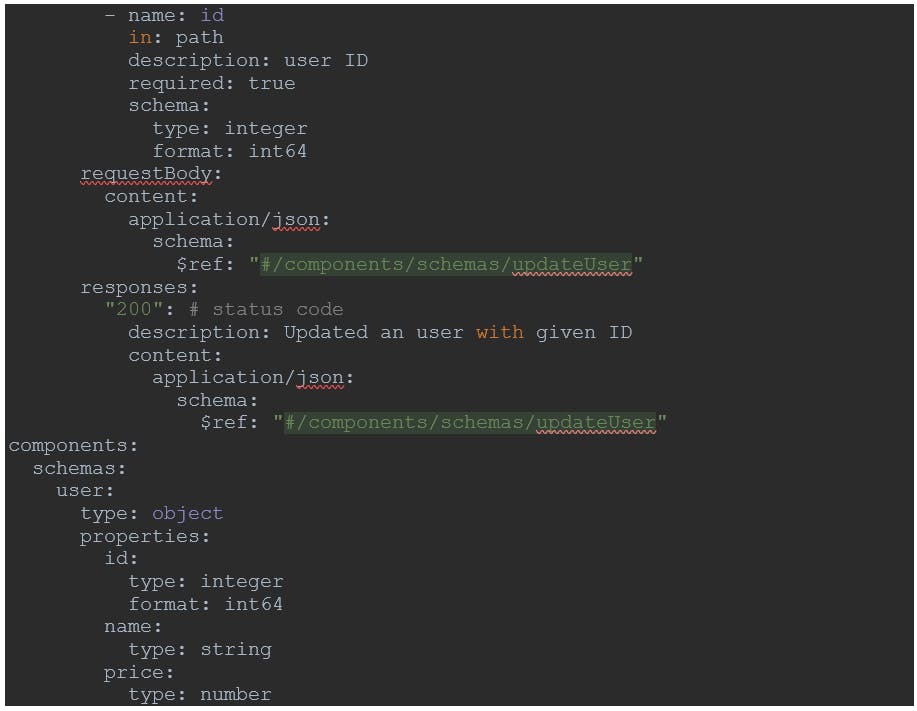
The above code in swagger.yml does the following:
We started off defining the version of the OpenAPI Specification in line 1. The OpenAPI version defines the overall structure of an API definition – what we can document and how we can document it. Line 2 to 5 contains the info section of the API specification: title, description (optional), and version . title is the API name. description is extended information about the API. version is an arbitrary string that specifies the version of the API. The above swagger.yml is a YAML file containing all of the information necessary to perform input parameter validation, output response data validation, URL endpoint definition, and Swagger UI.
The specification defines several endpoints for our API. Here, we have defined one endpoint for each of the CRUD (GET, POST, PUT and DELETE) operations.
The above code in swagger.yml does the following:
We started off defining the version of the OpenAPI Specification in line 1. The OpenAPI version defines the overall structure of an API definition – what we can document and how we can document it. Line 2 to 5 contains the info section of the API specification: title, description (optional), and version . title is the API name. description is extended information about the API. version is an arbitrary string that specifies the version of the API.
6)Handler for User Endpoint
In the swagger.yml file, we configured Connexion with the operationId value to call the various functions within user module. This means user.py module must exist and contain all the functions used in swagger.yml. Following is the user.py module that we need to create:
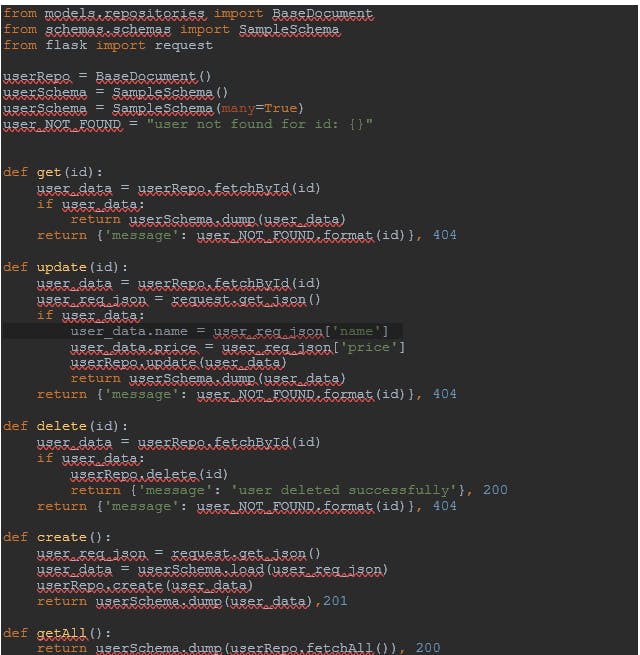
The above code in user.py does the following:
Start the Application
Finally, in line 25 we configure the application to run at port=5000. Our application is ready now. We can start the application by executing the below command:
python app.py We are done with all the coding part and it’s testing time. Once the application is started successfully and we navigate to localhost:5000/ui, the system will bring up a page that looks something like this:
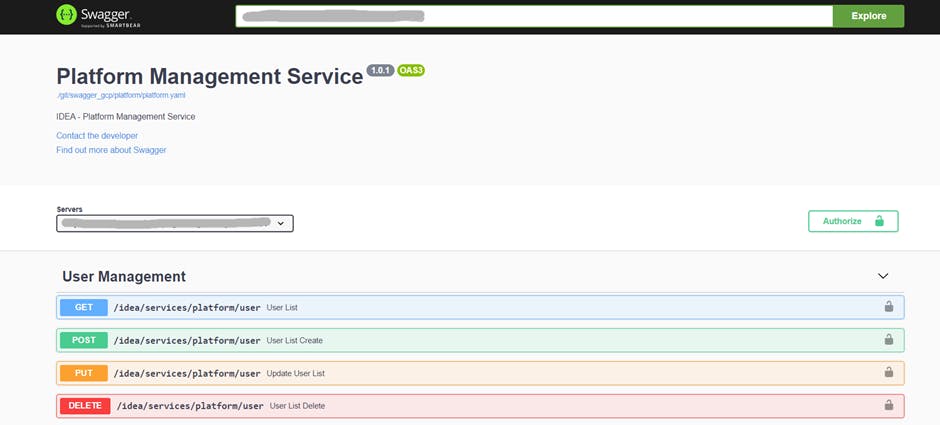
8)Swagger UI
We can now test our application to ensure that everything is working fine. We can open the URL localhost:5000/ui in our browser. Swagger interface and shows the list of URL endpoints supported by our application. This is built automatically by Connexion when it parses the swagger.yml file. If we click on the /user endpoint in the Swagger UI, the interface will expand to show a great deal more information about our API and should look something like this:
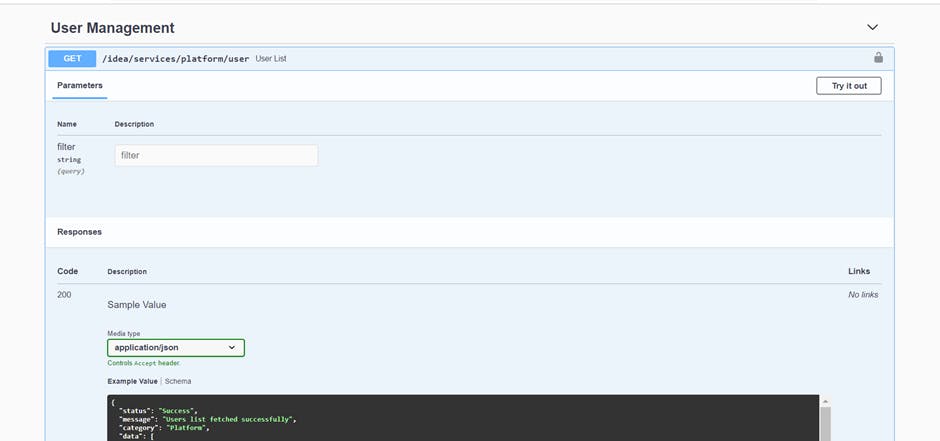
This displays the structure of the expected response, the content-type of that response, and the description text we entered about the endpoint in the swagger.yml file.
Using this Swagger UI, the API users can explore and experiment with the API without having to write any code to do so. Building an API this way is very useful. Not only is the Swagger UI useful as a way to experiment with the API and read the provided documentation, but it’s also dynamic. Any time we update the configuration file, the Swagger UI changes as well. This UI allows everyone to see all of the documentation we have included in the swagger.yml file and interact with all of the URL endpoints making up the CRUD functionality of the user interface.
Swagger UI also helps the developers with API testing, either in case of any issues reported or while adding new API’s to the existing application.
9)Conclusion
So, we have seen how easy it is to create a comprehensive REST API using Connexion and Flask. With the help of Connexion module and some additional configuration work, a useful documentation and interactive system can be put in place, which will make the API consumers life easy and enjoyable.